Mihaela Grigore
  • ๐Ÿ‘‹About
  • ๐Ÿ‘ฉโ€๐ŸญPersonal projects
    • Computer Vision | Deep Learning with Tensorflow & Keras (ResNet50, GPU training)
    • Computer Vision | Convolutional Neural Networks with PyTorch
    • Computer Vision | Facial Recognition with Keras, FaceNet, Inception, Siamese Networks
    • NLP | Topic modeling on tweets
    • NLP | Sentiment analysis of tweets: TextBlob, VADER and Flair
    • Time series | Exploration on Crypto price dataset
    • Data scraping | Social Media Scraping: Twitter Developer API for Academics
    • Data Scraping | Collecting historical tweets without Twitter API
  • โœ๏ธNotes
    • Machine Learning in Production
      • Feature transforms
      • Feature selection
      • Data journey
    • NLP
      • Information Retrieval
    • Computer Vision
    • Time series
      • Stationarity
    • Data
      • Labeling
    • Python
      • ndarray slicing with index out of bounds
  • ๐Ÿ“šReadings & other media
    • Computer Vision
      • Selection of research articles
    • NLP
      • Handwriting Text
      • Information Retrieval
      • Mono- / multilingual
      • Topic Modeling
      • Language Models
    • Time Series
    • Generative Adversarial Netoworks (GAN)
    • Python
      • Python basics
Powered by GitBook
On this page
  • Objective
  • Packages used
  • GPU support
  • Dataset
  • Implementation
  • GPU versus CPU training
  • Project contents
  1. Personal projects

Computer Vision | Deep Learning with Tensorflow & Keras (ResNet50, GPU training)

PreviousPersonal projectsNextComputer Vision | Convolutional Neural Networks with PyTorch

Last updated 3 years ago

Objective

  • Implement ResNet from scratch

  • using Tensorflow and Keras

  • train on CPU then switch to GPU to compare speed

If you want to jump right to using a ResNet, have a look at . In this repo I am implementing a 50-layer ResNet from scratch not out of need, as implementations already exist, but as a learning process.

See

Packages used

  • python 3.7.9

  • tensorflow 2.7.0 (includes keras)

  • scikit-learn 0.24.1

  • numpy 3.7.9

  • pillow 8.2.0

  • opencv-python 4.4.0.46

GPU support

The following NVIDIA software must be installed on your system:

  • NVIDIAยฎ GPU drivers โ€”CUDAยฎ 11.2 requires 450.80.02 or higher.

  • CUDAยฎ Toolkit โ€”TensorFlow supports CUDAยฎ 11.2 (TensorFlow >= 2.5.0)

  • CUPTI ships with the CUDAยฎ Toolkit.

  • cuDNN SDK 8.1.0 cuDNN versions).

Dataset

Implementation

Resnet50

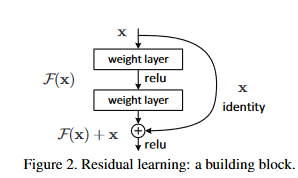
ResNets proposed a solution for the exploding/vanishing gradients problem common when building deeper and deeper NNs: taking the output of one layer and to jumping over a few layers and input this deeper into the neural network. This is called a residual block (also, identity block) and the authors illustrate this mechanism in their article like this:

The identity block can be used when the input x has the same dimension (width and height) as the output of the layer where we are feedforwarding x, othersize the addition wouldn't be possible. When this condition is not met, I use a convolution block like in the image below:

The only difference between the identity block and the convolution block is that the second has another convolution layer (plus a batch normalization) on the skip conection path. The convolution layer on the skip connection path has the purpose of resizing x so that its dimension matches the output and thus I can add those two together.

GPU versus CPU training

Project contents

โ”œโ”€โ”€ config.yaml               - configuration parameters at project level  
โ”œโ”€โ”€ example_predict.py        - example prediction script using a pretrained model
โ”œโ”€โ”€ example_train.py          - example script for training the ResNet50 model on a given dataset
โ”œโ”€โ”€ images              
โ”‚   โ”œโ”€โ”€ processed             - processed image data, obtained from raw images, ready for feeding into the model during training  
โ”‚   โ”œโ”€โ”€ raw                   - raw image data  
โ”‚   โ””โ”€โ”€ test-samples          - test images for model prediction on unsees images  
โ”œโ”€โ”€ models                    - folder to save trained models   
โ”‚   โ”œโ”€โ”€ 202201312229          - saved trained model  
โ”œโ”€โ”€ requirements.txt          - project requirements  
โ””โ”€โ”€ src  
    โ”œโ”€โ”€ data                  - scripts for data manipulation 
    โ”‚   โ””โ”€โ”€ make_dataset.py   - preprocess training data from 'raw' folder and outputs into 'processed' 
    โ”œโ”€โ”€ models      
    โ”‚   โ”œโ”€โ”€ predict_model.py  - implements model prediction procedure  
    โ”‚   โ”œโ”€โ”€ resnet50.py       - contains class ResNet50, the implementation of the 50 layer ResNet model  
    โ”‚   โ”œโ”€โ”€ train_model.py    - implements model training procedure  
    โ””โ”€โ”€ utils  
        โ””โ”€โ”€ basic_functions.py  
make_dataset.py --dataset 'Animals-10'

from the src/data folder

to see available parameters:

optional arguments:
-h, --help            show this help message and exit
--validation_split VALIDATION_SPLIT
                      How much training data to use for validation ? Default value: 0.2
--batch_size BATCH_SIZE
                      What batch size to use for training. Default value: 32
--epochs EPOCHS       How many epochs to train for ? Default: 40, with early stopping callback
--input_size INPUT_SIZE
                      What input size to set for the ResNet50 model architecture ? Default: '(64, 64)'
--channels CHANNELS   How many channels do training images have ? Assumed RGB images by default. Default: 3
--log_level LOG_LEVEL
                      How verbose do you want the logging level ? DEBUG: 10, INFO: 20, WARNING: 30
--fld FLD             Name of the training data folder. Must be placed inside images/processed. Default: Animals-10

and select your preferred training options.

example_predict.py --help

and choose the desired setting from:

optional arguments:
-h, --help            show this help message and exit
--checkpoint CHECKPOINT
                      Where to load the pretrained model from ? Default: random pick from inside models folder
--image IMAGE         Which image to classify (full path) ? Default: no default value, will throw error

For this project I'm using the .

ResNet is a family of Deep Neural Networks architectures introduced in 2015 . The original paper discussed 5 different architectures: 18-, 24-, 50-, 101- and 152-layer Neural Networks. I am implementing the 50-layer ResNet or ResNet50.

Following the ResNet50 architecture described in , the architecture I'm implementing in this repo has the structure illustrated below:

The easiest way to see the diffence in training duration is to open the notebook in this repository, , on Kaggle and follow the instructions for ativating GPU contained in the notebook. This is what I did in my case, as I don't have a separate GPU on my laptop.

To set up GPU support on a physical machine, follow .

To process the data for obtaining squared images of the pre-defined size (as per model architecture definition), run the script

To train a model, run the script:

To make predictions using a pre-trained model, use the script:

๐Ÿ‘ฉโ€๐Ÿญ
Keras' pre-trained models
project repository on GitHub.
10 Animals dataset available on Kaggle
He et al.
He et al. 2015
resnet-keras-code-from-scratch-train-on-gpu.ipynb
these instructions
make_dataset.py
example_train.py
example_predict.py
image
image
image